
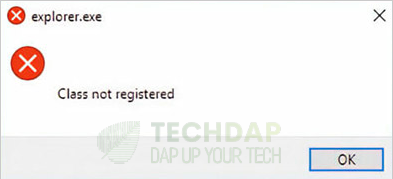
Fixing the Explorer.exe Class not Registered Error
Did you get the Explorer.exe Class not Registered error while trying to launch an app? If so, you have come to the right place. We recently encountered this error and managed to fix it by deploying some fixes. Lucky for you, we have compiled these fixes in this guide. You can follow through with ease and fix the error on your own.
What is the “Explorer.exe Class not Registered” error?
Windows Explorer is the default file manager used by the operating system. It allows you to sift through the stored files and allows you to manage them. But, if the program runs into a conflict with one of the other installed programs, it can give you an error. Windows throws this error when it is unable to launch the explorer executable.
Windows File Explorer’s executable might not launch due to many different reasons. Some of which we have listed for you in this article.
Why do you get the Explorer.exe Class not Registered error?
There can be many reasons why this error occurs, some of which, we have listed below.
- Conflicting applications: There are often hundreds of different apps installed on a computer. These apps run in the background and can often come into conflict with each other. And, you can get the “Explorer.exe Class not Registered” error due to which File Explorer fails to launch.
- Startup Issue: If the OS is unable to launch the File Explorer’s executable, you will get this error. Windows might be unable to launch it if your account is missing permissions.
- Windows Updates: Installing updates on Windows almost always comes with new issues. Try to roll updates back to see if that fixes this issue as we have demonstrated below.
- DLL files not registered: You must register the File Explorer DLL files so that it works. Windows does it by default, but, if the registry files are corrupt, you will have to do it yourself.
- User Account Issue: If your user account is missing permissions to start Explorer. So, you should create a new user account using the methods below
- Hard Drive Issues:If the hard drive has bad sectors or is generally in bad shape, you will run into such issues. As the hard drive stores the files and apps, it needs to retrieve them in an efficient manner. Otherwise, their service times out and throws errors such as the one in question.
Now that you know why the error occurs, you can move on to implementing the solutions below.
Fix Explorer.exe Class not Registered Error:
You can deploy the following steps on your computer to completely fix this issue on it.
Method 1: Turn off Old Internet Explorer Feature
You might be running into the Microsoft Edge not working issue due to this error. We recommend that you turn some Windows features off as mentioned in the steps below.
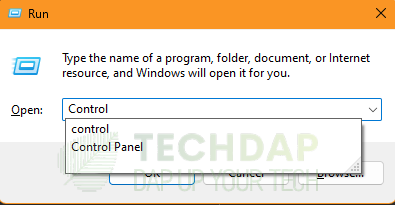
- Press “Windows + R” to launch the Run prompt, type in “control” and press “Enter” to start the control panel on your device.

Start Control Panel - Now, click on “Programs” and then select “Turn Windows Features On or Off“.
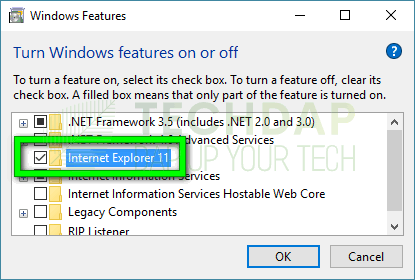
- A new window will open up, in here, make sure to uncheck the “Internet Explorer 11”.

Disabling Internet Explorer 11 - After you disable Internet Explorer, restart your computer and check to see if the issue is gone.
If using the above steps, you are unable to run the control panel, use the following steps to run it.
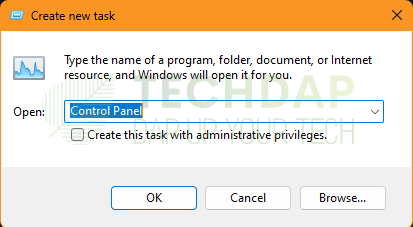
- Press “CTRL + Alt + Del” from your keyboard, and click on the “Task Manager” option.
- From the task manager, click on “File > Run New Task” and type in “Control Panel”.

Running Control Panel from Task Manager - Press “Enter” to run this task and you should be able to open up Control Panel.
Or, you can do the following.
- Press “CTRL + ALT + DEL” and select “Task Manager” to launch into the task manager.
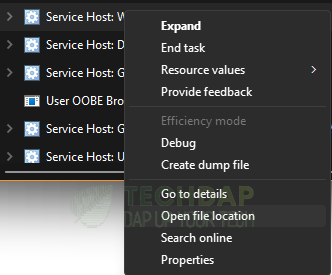
From here, right-click on “Service Host (Any Variation)” and select “Open File Location”.

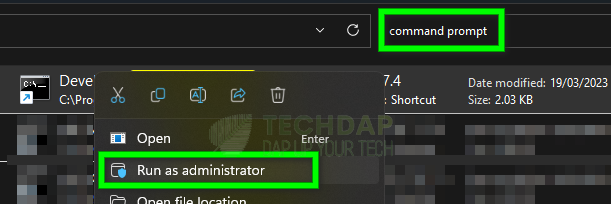
Open File Location - Now, click on “This PC” from the left, and in the search bar on the top, type in “command prompt”.
- Once it shows up, right-click on it and select “Run as Administrator”.

Running command prompt as administrator from the file explorer - Once run, type in “Start Control Panel” and press “Enter” to launch it.
Method 2: Uninstall Recent Windows Updates
Sometimes, a recent update might be causing the issue. Thus, you should try to uninstall the recent update using these steps.
- Press “Windows + R” to start the run prompt, type in “Control” and press “Enter”.
Start Control Panel - Now, click on the “Programs” button and then select the “Uninstall a Program” option.
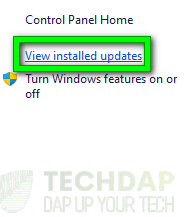
- Now, select “View Installed Updates”. On the next screen, a list of recently installed updates should show up.

Viewing All Installed Updates - From this list, if you are using Windows 11, click on the “Uninstall” button in front of the updates. Otherwise, right-click on the update and select “Uninstall”.

Uninstalling Recent Updates on Windows - Follow through with the on-screen steps to completely uninstall the update.
- Check to see if this fixes the Explorer.exe Class not Registered issue.

Method 3: Sign Back In
Some users confirmed that they were able to fix this issue using a trick that prompted a new sign-in. To do this, follow the steps below.
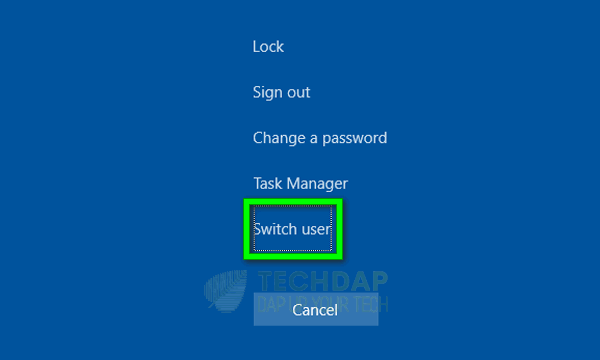
- Press “Ctrl + ALT + Del” to launch the options menu and select the “Switch User” option.

Switch User in Windows - From here, sign back into your account using your credentials.
- Check to see if the Explorer.exe Class not Registered issue is fixed.
Method 4: Restart Windows Explorer
Sometimes, you can get the error if the File Explorer was unable to start. For that, we can try to restart the explorer ourselves. To do so:
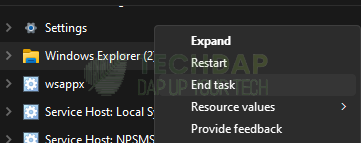
- Press “CTRL + Alt + Del” and select the “Task Manager” option.
- From there, right-click on the “Windows Explorer” option and select “End Task”.

Selecting End Task button - Now, click on “File > Run New Task” and type in “Explorer.exe” in the new window.
- Press “Enter” and File Explorer should start again.
- Check to see if this works in fixing the issue.
Method 5: Register File Explorer Frame DLL
If the file explorer registry files are absent, your pc will run into errors while trying to start it up. Thus, follow these steps to recreate this.
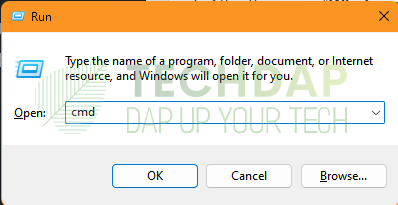
- Press “Windows + R” to start the run prompt, type in “cmd” and press “Shift + CTRL + Enter” to start with admin permissions.

Typing in “cmd” in the dialogue box - In the command prompt, type in the following command and press “Enter” to execute it.
regsvr32 ExplorerFrame.dll
- Now, restart your computer and check to see if the issue goes away.
Alternatively:
- Copy the “ExplorerFrame.dll” file from another PC, it should be in the following directory.
C:\Windows\System32\ExplorerFrame.dll
- Now, paste this in the same directory on your computer and also in the following directory.
C:\Windows\SysWOW64
- After pasting this file, restart your computer and confirm that the issue is fixed.
Method 6: Run SFC and DISM Scans
Windows has preinstalled tools to fix missing file issues. You can run them using the following steps.
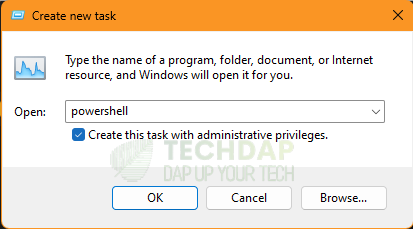
- Press “Ctrl + Shift + Esc” to run the task manager.
- From there, select “File > Run New Task“, and type in “Powershell”.
- Select the “Create this task with administrative privileges” check box and press “Enter”.

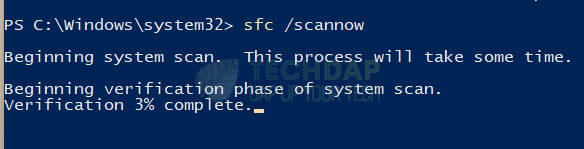
Running Powershell with administrative privileges. - Type in “sfc /scannow” and press “Enter”.

Running SFC Scan - Wait for the scan to finish and it should replace any missing files.
- After that, type in the following command and press “Enter”.
DISM /Online /Cleanup-Image /RestoreHealth
- Check to see if running these commands helps in fixing the issue.
Method 7: Disable Startup Programs
Sometimes, startup programs can cause this error. To disable them:
- Press “Ctrl + Shift + ESC” to launch the task manager.
- Click on the “Startup” tab and right-click on the “iCloud” program and select “Disable”.

Disable Startup Programs - Repeat this process for all listed programs in there.
- Check to see if this fixes the issue.

Method 8: Reset Default Apps and Make Edge Default
Conflicts in the default applications can arise and cause the error that you are facing. To fix this, we can try to reset the default apps and reconfigure Edge to be the default browser. For that:
- Press “Windows + I” to launch into the settings, select “Apps” and then select “Default Apps” from the left side.
- Now, scroll down to the bottom and select the “Reset” button in front of the “Reset all Default Apps” option.

Reset Default Apps - After this, make Edge your default browser and exit out of the settings.
- Check to see if doing this fixes the Explorer.exe Class not Registered error.

Method 9: Create New User Account
If the issue lies with your user account configuration, it can be useful to create a new user account. For that:
- Press “Windows + I” to launch into settings and select the “Accounts” option.
- Click on the “Family & Other Users” option.
- Select the “Add Someone else to this PC” option. Follow through with the on-screen instructions to add a new user account to your PC

Selecting the “Add Someone else to this PC” option - After this, check to see if you are able to fix the class not registered problem.

Method 10: Perform System Restore
The class not registered error can sometimes be due to a bad system image. To fix this, you can try to perform a restore to an earlier date on which your computer was fine. To do that:
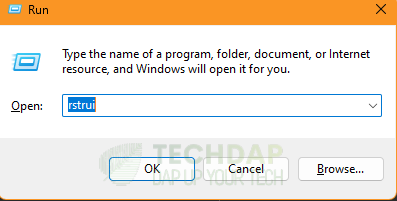
- Press “Windows + R” to start the run prompt.
- Type in “rstrui” and press “Enter”.

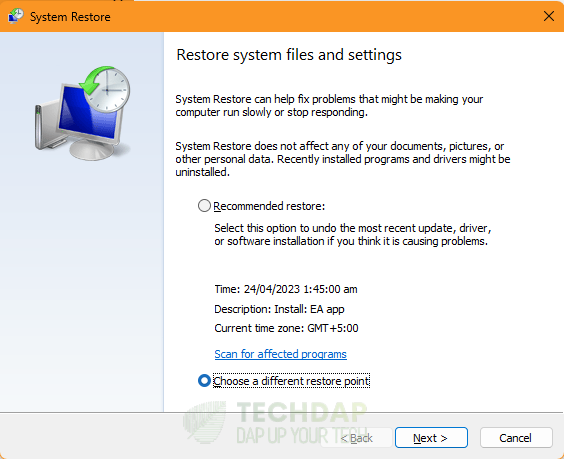
Typing in “rstrui” to launch the restore utility - Select the “Choose a Different restore point” option.

Choose a Different Restore Point - Select an appropriate restore point from the list and select the “Next” option.
- Proceed with the instructions on-screen to complete the restore process.
- Check to see if it fixes the Explorer.exe Class not Registered issue for you.
Final Solution:
If the above solutions are unable to fix the class not registered problem. You may create an installation media from the official Windows website. After that, you can use it to install a fresh copy of Windows.
To Conclude:
The above solutions fix the class not registered problem with File Explorer. Each of you might be facing a different variation of the issue and we have tried to cater to most of them. But, if you are still facing this issue, feel free to reach out to us or to the official Microsoft forums.